
Introduction
Working with specialised dental materials can feel a bit intimidating at first, can’t it? One wrong move and suddenly you’re dealing with a messy field instead of a clean working area. That’s where understanding the right approach makes all the difference.
- Introduction
- Understanding the Purpose Behind Viscostat Tips
- Why Proper Application Technique Matters
- Essential Tools for Controlled Use
- Common Errors and How to Avoid Them
- Chairside Preparation Strategies
- Safety Considerations Before Application
- Advanced Techniques for Improved Results
- Patient Communication and Comfort
- Practical Workflow Using Viscostat Tips
- Frequently Asked Questions
- How long should Viscostat remain in contact with tissue?
- Can it interfere with bonding procedures?
- Is it safe for all patients?
- What if bleeding persists after application?
- Are there alternatives available?
- Conclusion
When professionals discuss precision in restorative or operative dentistry, haemostatic agents often take centre stage. Knowing effective viscostat tips doesn’t just improve technique; it builds confidence. After all, smoother procedures mean happier patients and less chairside stress. So, how can small adjustments create noticeably better outcomes? Let’s explore.
Understanding the Purpose Behind Viscostat Tips
Before diving into technique, it helps to understand what you’re working with. Viscostat is commonly recognised as a haemostatic agent used to control minor bleeding during dental procedures. Simple idea, right? Yet, proper handling transforms it from a helpful product into a powerful clinical ally.
Bleeding control isn’t just about visibility. It influences bonding strength, impression accuracy, and overall procedural success. When tissue management goes smoothly, everything else follows suit. Rushing through this stage, however, often leads to contamination and compromised results.
Why Proper Application Technique Matters
Precision isn’t optional in dentistry; it’s essential. Applying too much material can irritate soft tissues, while too little might fail to achieve haemostasis. Finding that balance takes both knowledge and practice.
Technique also affects patient comfort. Controlled placement reduces unnecessary contact with surrounding tissue. And let’s be honest, nobody enjoys prolonged rinsing because excess solution spread everywhere. Mastering subtle movements ensures cleaner margins and predictable outcomes.
Essential Tools for Controlled Use
Success rarely depends on a single product. Instead, it’s about how tools work together. Using the right applicator tip, isolation method, and suction support enhances effectiveness.
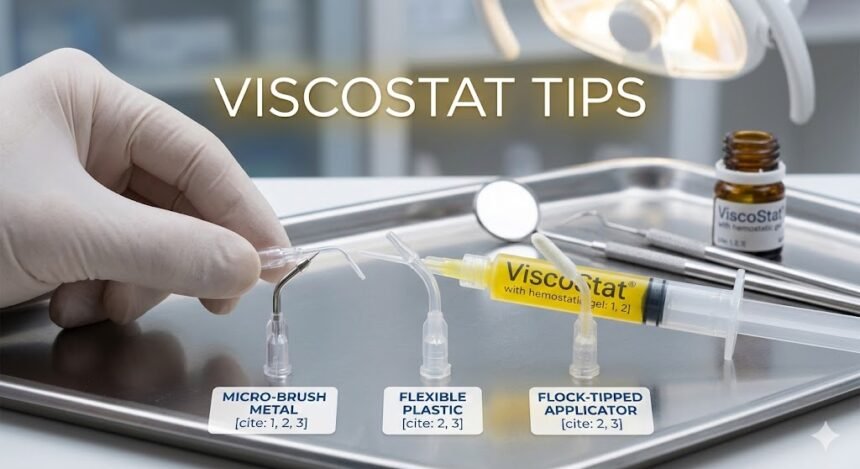
Cotton pellets, microbrushes, or syringe tips each serve specific purposes. Selecting wisely prevents waste and improves placement accuracy. Small decisions at setup stage often determine the ease of the entire procedure.
Common Errors and How to Avoid Them
Even experienced practitioners occasionally slip into habits that reduce efficiency. Awareness helps prevent these pitfalls before they impact results.
A thoughtful pause before application can prevent overuse. Meanwhile, proper isolation ensures the agent works exactly where intended.
Mistakes to Watch Out For
- Applying excessive pressure during placement
- Leaving material on tissue longer than recommended
- Failing to rinse thoroughly before proceeding
- Ignoring manufacturer guidelines
- Skipping isolation techniques
Correcting these missteps can dramatically enhance treatment quality.
Chairside Preparation Strategies
Preparation often determines whether a procedure flows smoothly or turns chaotic. Setting up materials within easy reach saves time and reduces distraction. When everything’s organised, focus remains where it should be on the patient.
Clear communication with assistants also plays a role. Coordinated teamwork ensures materials are delivered precisely when needed. A well-prepared environment supports accuracy and minimises stress.
Safety Considerations Before Application
Patient safety always comes first. Reviewing medical history helps identify sensitivities or contraindications. Although complications are rare, caution remains wise.
Protective measures such as proper suction and eye protection shouldn’t be overlooked. Maintaining a clean field protects both practitioner and patient. When safety protocols become routine, procedures feel controlled and professional.
Advanced Techniques for Improved Results
Once fundamentals are mastered, refining technique elevates outcomes further. Subtle adjustments—like angled placement or minimal reapplication—can improve efficiency significantly.
Precision Placement
Angling the applicator slightly allows better access to subgingival areas without unnecessary spread. Small movements create major differences.
Time Management
Monitoring contact duration prevents overexposure. A timer or mental count ensures consistent results.
Integration with Other Materials
When coordinating with bonding agents or impression materials, sequencing matters. Proper rinsing and drying maintain compatibility and prevent interference.
Mastering these advanced strategies enhances predictability and professional confidence.
Patient Communication and Comfort
Clinical skill alone isn’t enough. Explaining each step reassures patients and builds trust. A quick, friendly explanation—“This helps control minor bleeding so we can work accurately”—often eases anxiety.
Comfort also depends on efficiency. Minimising procedural delays reduces fatigue and discomfort. When patients feel informed and respected, their overall experience improves significantly.
Practical Workflow Using Viscostat Tips
Let’s break it down into a clear, repeatable sequence. A consistent approach prevents confusion and ensures reliable outcomes.
Before beginning, confirm isolation and dryness. After application, reassess tissue condition before moving forward.
Step-by-Step Workflow
- Review patient history and confirm no contraindications
- Isolate treatment area using appropriate barriers
- Apply minimal, targeted amount of material
- Allow recommended contact time
- Rinse thoroughly and inspect tissue
- Proceed with restorative or impression steps
Following these viscostat tips consistently builds efficiency over time.
Frequently Asked Questions
How long should Viscostat remain in contact with tissue?
Contact time varies by manufacturer instructions, but brief exposure—usually under a few minutes—is common. Always verify guidelines for accuracy.
Can it interfere with bonding procedures?
If not rinsed properly, residue may affect adhesion. Thorough irrigation eliminates this concern.
Is it safe for all patients?
Most patients tolerate it well. However, reviewing medical history ensures suitability and prevents complications.
What if bleeding persists after application?
Reassess isolation and consider reapplication in controlled amounts. Persistent issues may require alternative methods.
Are there alternatives available?
Yes, several haemostatic agents exist. Selection depends on clinical preference and case requirements.
Conclusion
Precision in dentistry depends on preparation, awareness, and careful execution. Mastering practical viscostat tips enhances bleeding control and strengthens overall treatment outcomes. Small refinements in technique reduce complications and improve patient comfort. By prioritising safety, consistency, and clear communication, professionals build lasting confidence chairside. In the end, it’s those subtle improvements that transform routine procedures into seamless experiences.